Gradio is a GUI that runs on a combination of Python and JavaScript, so if you’re building the JavaScript part yourself, you need to be careful to ensure it communicates properly with the Python side. I don’t use site embedding, so I don’t have much to do with it…
Below is a small, self-contained Gradio app that actually works with the official “Creating a Website Widget from a Gradio Chatbot” widget JavaScript. I will first give the code, then walk through it slowly and clearly so you can see why it works and how it connects to the widget.
1. The basic working app.py
This version is written to match exactly what the Gradio widget guide expects:
- It uses
gr.ChatInterface.
- It uses
multimodal=True, so the first argument is a {"text": ..., "files": [...]} dict, just like in the docs. (Gradio)
- It returns a list of strings, so the widget JavaScript can safely do
result.data[0].join('\n'), as shown in the guide. (Gradio)
# app.py
# Minimal Gradio chatbot that works with the official website widget example.

import gradio as gr


def chat(message, history):
    """
    This function is called every time the user sends a message
    from the widget (or the Gradio UI).

    Parameters
    ----------
    message : dict
        Because we set `multimodal=True` on ChatInterface, Gradio passes
        a dictionary here with the following shape:
          {
              "text":  "<user message as a string>",
              "files": ["/path/to/file1", "/path/to/file2", ...]
          }
        The widget example sends exactly this shape.

    history : list
        A list representing the chat history.
        We don't need it for this simple example, but it must be accepted.

    Returns
    -------
    list[str]
        A list of strings. The JavaScript widget receives this list
        as `result.data[0]` and then calls `.join('\\n')` on it.
        So returning a list is critical.
    """
    # Safely get the text the user typed
    if isinstance(message, dict):
        user_text = message.get("text", "")
    else:
        # Fallback, in case message is not a dict for some reason
        user_text = str(message)

    # Build a list of strings that will become the bot's reply.
    # Each item in this list will become one "line" in the widget.
    response_lines = [
        "Hello from your Gradio Space!",
        f"You said: {user_text}",
        "",
        "This response is a *list of strings*,",
        "so the website widget's `result.data[0].join('\\n')` works.",
    ]

    return response_lines


# Create the chatbot interface.
# - type="messages"   → history is handled in messages format (as in docs)
# - multimodal=True   → input is a dict {text, files}
# - api_name="chat"   → HTTP endpoint is /chat (the widget calls this)
demo = gr.ChatInterface(
    fn=chat,
    type="messages",
    multimodal=True,
    title="Widget Demo Bot",
    api_name="chat",   # this matches the "/chat" path used in the JS guide
)


if __name__ == "__main__":
    # Run this locally with:  python app.py
    demo.launch()
This file alone is enough to:
- run locally in a Gradio browser window, and
- work correctly when called from the official widget JavaScript in the guide. (Gradio)
2. How this ties into the official widget guide
The Gradio guide “Creating a Website Widget from a Gradio Chatbot” shows JavaScript like this (simplified): (Gradio)
const result = await client.predict("/chat", {
  message: { text: userMessage, files: [] },
});

const botMessage = result.data[0].join('\n');
appendMessage(botMessage, 'bot');
There are three very important expectations here:
-
Endpoint name ("/chat")
- The widget calls
client.predict("/chat", ...).
- Our Python
ChatInterface sets api_name="chat", which exposes that function at /chat.
- That matches exactly what the widget uses.
-
Input format (multimodal dict)
- The widget sends
message: { text: userMessage, files: [] }.
- In Gradio 5, when you use
multimodal=True on ChatInterface, the first parameter to your function is a dict like that:
{"text": <str>, "files": <list-of-paths>}. (Gradio)
- That is why the function parameter is
message, and inside we do message.get("text", "").
-
Output format (list of strings)
- The widget does
result.data[0].join('\n'). That only works if result.data[0] is an array/list, not a single string.
- Whatever your Python function returns becomes
result.data[0] in JS (for the first output). (Gradio)
- So we return
response_lines, a list[str] in Python, which becomes an array of strings in JavaScript.
- Now
.join('\n') succeeds, and you do not get TypeError: result.data[0].join is not a function.
In your original code, you did:
def chat(message, history):
    return "Hello"  # a plain string
That is perfectly valid for the Gradio UI, but then:
result.data[0] is "Hello" (a string),result.data[0].join('\n') throws a TypeError,- and you see the exact error you described.
The only real change you need is: return a list of strings instead of a plain string.
3. How to run this locally (step-by-step)
-
Create a virtual environment (optional but recommended):
python -m venv venv
source venv/bin/activate  # Linux/macOS
# or:
venv\Scripts\activate     # Windows
-
Install Gradio:
pip install "gradio>=5.9,<6.0"
The >=5.9,<6.0 range keeps you on Gradio 5, which is what the current website widget docs describe. (Gradio)
-
Save the app.py from section 1 in the same directory.
-
Run:
python app.py
-
Gradio prints a local URL like http://127.0.0.1:7860. Open it in your browser.
- You should see the chatbot UI.
- When you type a message, it replies with multiple lines (the list we returned).
At this point, you know that:
- The Python code runs.
- The Gradio UI works.
- The function receives a dict with
"text" and "files", and returns a list of strings.
4. How to deploy it as a Hugging Face Space
The widget guide is written around using a public Space, like abidlabs/gradio-playground-bot. (Gradio)
You can use your own Space instead.
4.1 Required files
Create two files:
-
app.py – the code above.
-
requirements.txt – to tell Spaces which packages to install:
gradio>=5.9,<6.0
Nothing else is strictly required for this minimal example.
4.2 Steps on Hugging Face
- Go to Hugging Face → “New Space” → choose Gradio template.
- Name it something like
your-username/website-widget-test.
- Upload
app.py and requirements.txt.
- Wait for the build to finish.
- Once it is running, visit the Space and confirm the chatbot works.
The Space URL will look like:
https://your-username-website-widget-test.hf.space
You will use this URL inside your website’s JavaScript.
5. How to hook it up to your website widget
The official guide gives you HTML/CSS/JS for a small floating chat window. The key part is the JavaScript that connects to your Space. (Gradio)
A minimal version looks like this:
<script type="module">
import { Client } from "https://cdn.jsdelivr.net/npm/@gradio/client/dist/index.min.js";
async function initChatWidget() {
// 1. Connect to YOUR Space
const client = await Client.connect("https://your-username-website-widget-test.hf.space");
// 2. Grab DOM elements (buttons, input, container, etc.)
const chatToggle = document.getElementById("chat-toggle");
const chatContainer = document.getElementById("chat-container");
const closeChat = document.getElementById("close-chat");
const chatInput = document.getElementById("chat-input");
const sendButton = document.getElementById("send-message");
const messagesContainer = document.getElementById("chat-messages");
chatToggle.addEventListener("click", () => {
chatContainer.classList.remove("hidden");
});
closeChat.addEventListener("click", () => {
chatContainer.classList.add("hidden");
});
function appendMessage(text, sender) {
const div = document.createElement("div");
div.className = `message ${sender}-message`;
div.textContent = text;
messagesContainer.appendChild(div);
messagesContainer.scrollTop = messagesContainer.scrollHeight;
}
async function sendMessage() {
const userMessage = chatInput.value.trim();
if (!userMessage) return;
appendMessage(userMessage, "user");
chatInput.value = "";
try {
// 3. Call your /chat endpoint with a multimodal message
const result = await client.predict("/chat", {
message: { text: userMessage, files: [] },
});
// 4. Get the bot reply: this is an array of strings
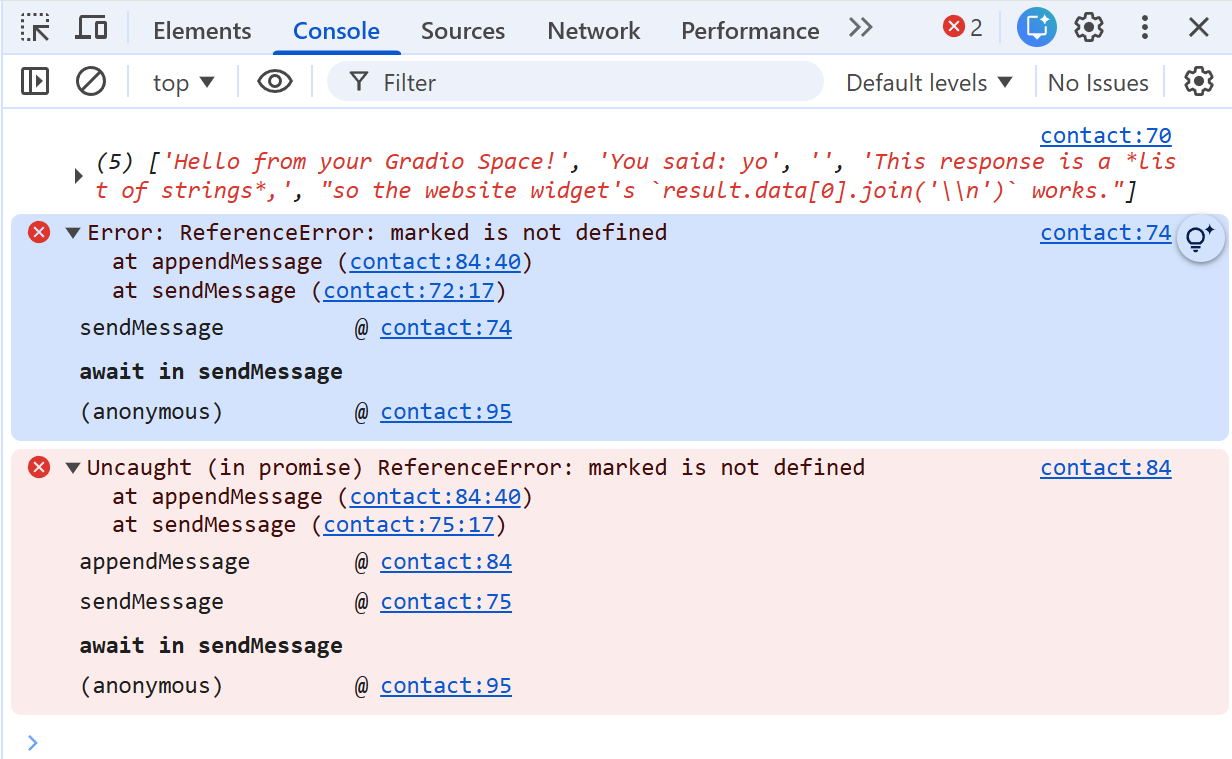
console.log("raw data[0]:", result.data[0]);
const botMessage = result.data[0].join("\n");
appendMessage(botMessage, "bot");
} catch (error) {
console.error("Error from widget:", error);
appendMessage("Sorry, there was an error.", "bot");
}
}
sendButton.addEventListener("click", sendMessage);
chatInput.addEventListener("keydown", (e) => {
if (e.key === "Enter") sendMessage();
});
}
initChatWidget();
</script>
Because your Python code:
- uses
multimodal=True
- returns a
list[str]
the call result.data[0].join("\n") now works exactly as in the official Gradio guide.
6. Mental model: data shapes (beginner-safe summary)
To keep it conceptually clear:
-
Think of the Gradio app as a function you expose over HTTP.
-
For each prediction, Gradio sends your function:
- the new user message (
message),
- the existing chat history (
history). (Gradio)
-
Your function returns something (string, list of strings, message dicts, etc.).
When you call that app from JavaScript using @gradio/client:
result.data[0] is exactly whatever you returned from Python (first output), but in JavaScript form. (Gradio)
So:
- If you return
"Hello" → result.data[0] is a string → .join() fails.
- If you return
["Hello"] → result.data[0] is an array → .join() works.
The widget JS in the guide was written for the playground bot Space, whose backend returns a list of strings. (Hugging Face)
Your original code returned just a string, which is why you saw join is not a function.
The app.py given at the top simply makes your Space behave like the example Space regarding input and output shapes, so the widget code “just works”.